
Step-by-Step Guide: Organizing Your Data Chronologically Using Microsoft Excel

Step-by-Step Guide: Organizing Your Data Chronologically Using Microsoft Excel
Quick Links
When you’re trying to look at a set of data in a spreadsheet over time, it’s often helpful to be able to sort the data using the dates in that range, which Microsoft Excel allows you to do using the built-in sort tool. Here’s how.
Sorting Dates in Ascending or Descending Order
The easiest way to sort data in Microsoft Excel by date is to sort it in chronological (or reverse chronological) order. This sorts the data with the earliest or latest date starting first, depending on your preference.
To do this, open your Excel workbook and select your data. You can do this using your mouse or trackpad, or by clicking a cell in the range and pressing Ctrl+A on your keyboard.
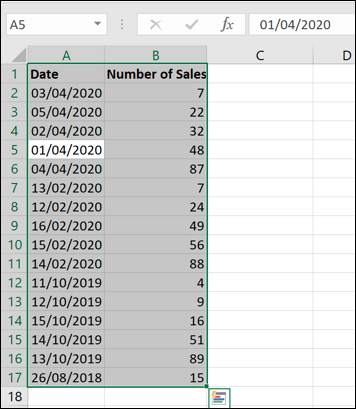
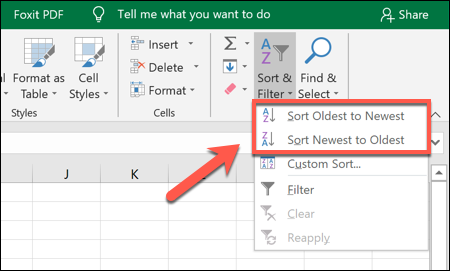
With your data selected, click the “Sort & Filter” button in the “Home” tab of the ribbon bar. This is where you go to sort values in Excel in various ways, including by date.
Related: How to Sort Values in Microsoft Excel
In the “Sort & Filter” drop-down menu, you’ll have options to sort data in ascending or descending order. If Excel detects dates in your selected data, the options should show as “Sort Oldest To Newest” or “Sort Newest To Oldest.”
If you want to sort the data so that the earliest date comes first, click the “Sort Oldest To Newest” option. Otherwise, click “Sort Newest To Oldest” to sort the data so that the latest date comes first.
Once you select your preferred option, Excel will automatically sort the data in that order, using the date column as the reference point.
The first date (under your column label) will be the earliest or latest date in the set.
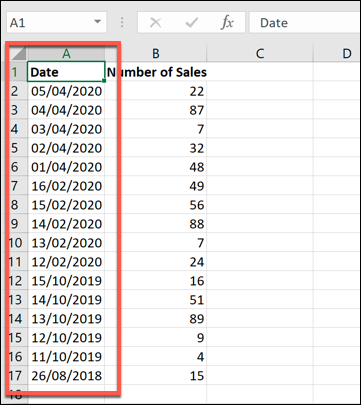
If you’re having problems, select only the column containing the dates and then click Home > Sort & Filter > Sort Oldest To Newest or Sort Newest To Oldest.
Microsoft Excel will display a “Sort Warning” box, asking you whether you wish to sort the data around it (the rest of your data) to ensure that the overall data stays intact, otherwise only the date column will be sorted.
Make sure that “Expand The Selection” is highlighted and then click the “Sort” button.
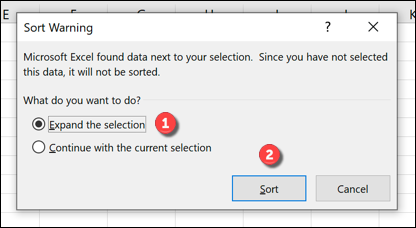
This will ensure that your entire data set is sorted in ascending or descending order, using the dates as the reference point.
Sorting Dates by Month or Year
It can sometimes be useful to organize data by specific months or years. You might, for instance, be looking to see how many birthdays fall in these groups.
You can do this by using the
`MONTH`
or
`YEAR`
functions. This identifies the month or year number from a date and provides it in a separate column. This column can then be sorted in ascending or descending order.
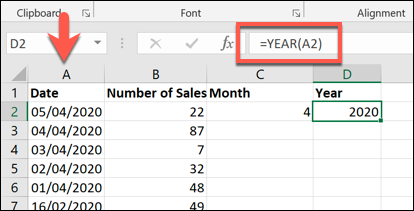
To do this, create a new column called “Month” or “Date” to the right of your existing data. In the first cell below the column label, type
`=MONTH(A2)`
or
`=YEAR(A2)`
, where “A2” is the first cell in your data range to contain a date.
To ensure that your
`MONTH`
or
`DATE`
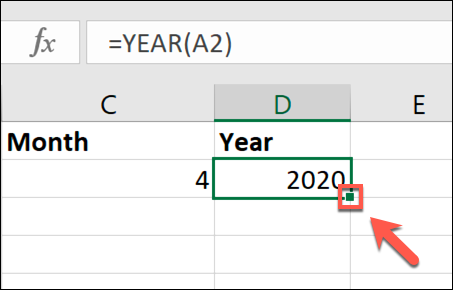
formula is used for your entire data set, double-click the small green square icon in the bottom-right corner of the cell. This will automatically duplicate the formula for all other rows where it can find data to the left of it.
With your
`MONTH`
or
`DATE`
formula in place, select your “Month” or “Date” column and then click Home > Sort & Filter.
From the drop-down menu, select either the “Sort Smallest To Largest” or “Sort Largest To Smallest” options. If you sort by smallest to largest, Excel will sort your data with the earliest year or month coming first.
Likewise, Microsoft Excel will sort by the latest year or month if you choose the largest to smallest option.

You’ll need to confirm that you want to use the entire data set, so make sure that “Expand The Selection” is highlighted and then click “Sort” in the “Sort Window” warning box.

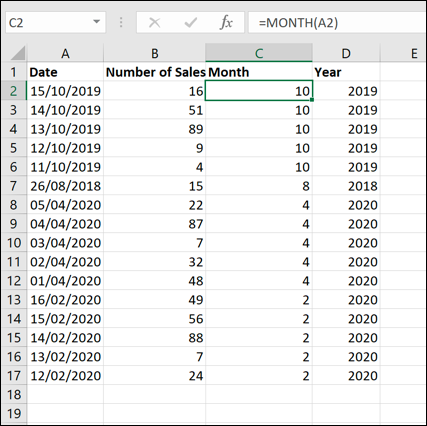
Depending on the options you selected, Excel will immediately sort your data using the month or year column you created.
Also read:
- [New] 2024 Approved Melodic Instagram Reels Blending Music, Voiceovers
- [New] In 2024, MiniMovie Magician
- [New] Introduction to Dynamic Graphic Techniques
- [Updated] Exploring the Boundaries of True Black on ASUS's Professional Screen
- [Updated] Sweet Slumber Scenes Video Critique for 2024
- Discord Overlay Issues? - Fast Fixes and Solutions
- Expert Fixes for Persistent Valheim Crashes on Windows/Linux Platforms
- Fix: WWE 2K22 Continuously Crashes While Playing on PC – Solutions Inside!
- How to Fix My Apple iPhone 14 Plus Location Is Wrong | Dr.fone
- How to Harness the Potential of AI Conversations by Leveraging Quora’s Poe for Chatbot Access
- Immediate Resolve: What to Do if Palworld Won't Launch or Load
- Oculus Link Not Functioning? Here Are 6 Fast Fixes to Try
- Smooth Sailing in Los Santos – Overcome GTA 5 Stalling & Crashing Problems
- Title: Step-by-Step Guide: Organizing Your Data Chronologically Using Microsoft Excel
- Author: Paul
- Created at : 2024-12-10 16:26:49
- Updated at : 2024-12-12 16:58:03
- Link: https://win-able.techidaily.com/step-by-step-guide-organizing-your-data-chronologically-using-microsoft-excel/
- License: This work is licensed under CC BY-NC-SA 4.0.