
Unlocking Secrets: Tips on Disabling Security in Excel Spreadsheets
Unlocking Secrets: Tips on Disabling Security in Excel Spreadsheets
Quick Links
- Unprotecting a Workbook vs. Unprotecting a Worksheet
- Unprotect an Excel Workbook
- Unprotect an Excel Worksheet
Whether you want to make structural changes or modify the content in your Microsoft Excel workbooks, you’ll have to unprotect those items first. We’ll show you how to do just that.
If you used a password to protect your Excel items , you’ll need that password in the unlocking procedure below, so keep that handy.
Related: How to Lock Cells in Microsoft Excel to Prevent Editing
Unprotecting a Workbook vs. Unprotecting a Worksheet
If you’d like to make structural changes to your workbook, like adding, moving, deleting, hiding, or renaming your worksheets, you’ll have to unprotect your workbook (as opposed to unprotecting a worksheet). Doing that unlocks the options to make the above-mentioned changes to your workbook.
In case you’re looking to modify the data in your worksheet, such as changing the content of a cell, you’ll have to unprotect your sheet. This allows you to add and remove content from your worksheet.
Either way, it’s easy to unprotect your items in Excel as we’ll explain below.
Unprotect an Excel Workbook
To be able to make structural changes to your workbook, first, launch your spreadsheet with Microsoft Excel.
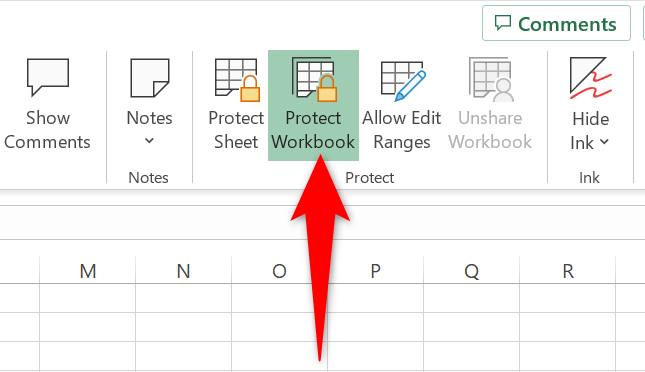
In Excel’s ribbon at the top , click the “Review” tab.

On the “Review” tab, from the “Protect” section, choose “Protect Workbook.”
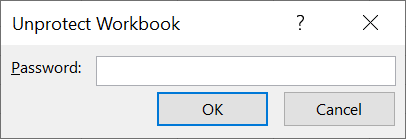
If you didn’t use a password to protect your workbook, your workbook is now unprotected.
In case you used a password for protection, then in the “Unprotect Workbook” box that opens, type that password and click “OK.”
Your workbook is now unlocked and you can add, remove, delete, hide , and rename worksheets in it. Enjoy!
Related: How to Rename Worksheet Tabs in Excel
Unprotect an Excel Worksheet
To change the content of your cells in your worksheet, first, open your spreadsheet with Microsoft Excel.
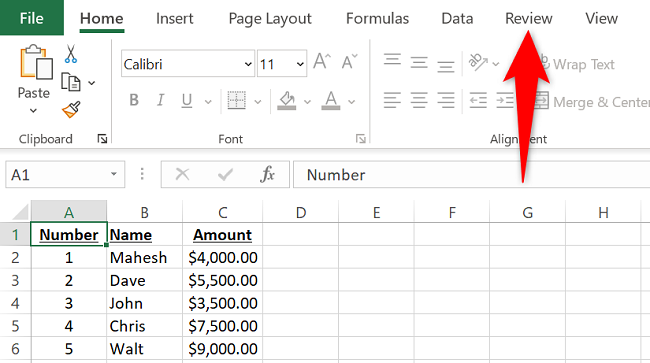
When Excel opens, in the ribbon at the top, select the “Review” tab.
On the “Review” tab, from the “Protect” section, choose “Unprotect Sheet.”
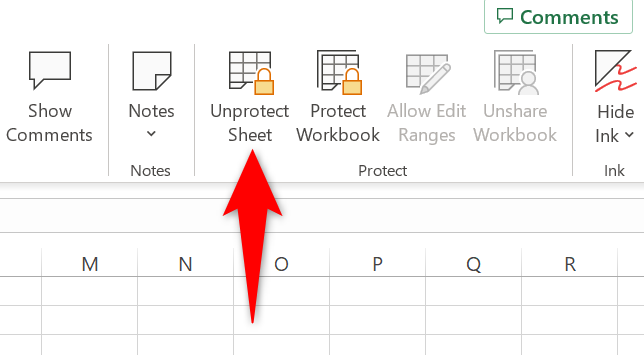
If you didn’t use a password to protect your worksheet, your worksheet is now unlocked.
In case you did use a password, then in the “Unprotect Sheet” box, enter your password and click “OK.”

Your worksheet is now unlocked and you can make whatever changes you want to it.
Need to re-protect your Excel workbook ? If so, it’s a quick and easy process to do that.
Related: How to Protect Workbooks, Worksheets, and Cells From Editing in Microsoft Excel
Also read:
- [New] 2024 Approved Offline Android Delights The Ultimate Free Game List
- [New] Unraveling Why iMovie Alters Video Borders for 2024
- Comprehensive Fixes for Call of Duty Warzone - Dealing with Dev Error 6634 (Updated Guide )
- In 2024, 5 Ways to Transfer Music from ZTE Nubia Flip 5G to Other Android Devices Easily | Dr.fone
- No Display for Hardware Drives in W10/11
- Prowess in Color Correction The Ultimate 11 Tutorials
- Solving Lag Issues in 'Avatar: The Game': Optimizing Performance on Pandora
- Solving Your Dilemma: Ultimate Guide to Troubleshoot CS: GO Failure to Start
- Star Wars Battlefront II - Conquering the Darkness of a Persistent Black Screen Issue
- Step-by-Step Fixes for Incomplete Driver Setup on AMD Graphics Cards
- Troubleshooting Civilization 6 Installation Issues in Windows 10 Environments
- Ultimate YouTube Branding Guide Top Names for Successful Video Blogging (Keep It to or Under 156 Characters) for 2024
- Updated 2024 Approved The Ultimate Videopad Video Editor Review Features, Pricing, and More
- Title: Unlocking Secrets: Tips on Disabling Security in Excel Spreadsheets
- Author: Paul
- Created at : 2024-12-03 16:00:46
- Updated at : 2024-12-06 16:39:51
- Link: https://win-able.techidaily.com/unlocking-secrets-tips-on-disabling-security-in-excel-spreadsheets/
- License: This work is licensed under CC BY-NC-SA 4.0.